Showing posts with label sketchup tutorial. Show all posts

Saturday, May 23, 2015

Sketchup Tutorial Part 4 - Understanding the Basic

Shortcut settings in Sketchup  


Previously, in part 3, we have covered how to setting up Preference settings in Sketchup. Today, we are going to finish up our Preference settings by going over Shortcut settings in Sketchup.

The most important thing that you settings up the shortcut is because it will save you lots of time while you are working on the project. The only negative things of Shortcut is it might take little bit of learning curve.

It is very hard to remember all the Shortcut settings. My advise is trying to use Shortcut on things that you often uses (Pull/Push, Draw Line, Draw Rectangle, and etc.) and expand little by little.

In Sketchup, Shortcut settings are already been assigned as default. The default setting is very good. However, you might wants to change few settings later on.

In this tutorial, we are going to cover

1. Shortcut Settings


Software that we are using: Sketchup 2015
(Sketchup 8.0 or below have similar interface so you shouldn't have any issue with following the tutorial)


Shortcut Settings

1. Window > Preferences


Click on Shortcuts


1. Filter: Works as "Search" type the functions that you are looking for

2. Function: Lists of Function that you can assign Shortcuts

3. Add Shortcut: After you have selected Function, Assign your Shortcut here

4. Assigned: Showing Function Shortcut if it is already been Assigned


Here is my Example of using shortcut to speedup my work flow:

I often uses "Delete" a lot! Especially, when I am importing 3D models from Revit or other program, so many lines that I have to clean up the model. However, default setting in Sketchup for "Delete", you have to hit "Delete key" in your keyboard. It might seems not big of deal. But I often not just doing "Delete". I delete, draw lines, push/pull the object, and more almost at the same time! All of these other function Shortcut keys are located in left side of my keyboard.

Example:

Your Left hand mostly occupied with the shortcut keys and Right hand for the mouse


You see how does "Delete" key is that faraway from the shortcut keys that located in your left hand? Your Right hand is most of times on the mouse and left hand is for the Shortcut key that is located on the left side of the keyboard. So every time that I that I have to delete something, I need to come all the way to hit "Delete" key.

So I have changed my Shortcut key for "Delete" to hit "D" on the keyboard instead of hitting "Delete" key. So now I can do all my job without moving my left hand from my keyboard.
Isn't it efficient for simple change?

Here is the way you can change your Shortcut keys:


1. Type "delete" on the Filter box
2. Select "Edit/Delete"
3. Type "D" 
4. Click on the + 


You see now that "D" is also Assigned for Edit/Delete


Saving your Shortcut settings

1. Click Export 
2. Name the file


Importing your Shortcut or someone else's settings

1. Click Import
2. Select the file


Simple enough right?
It is very basic and simple move but it impacts on your working efficiency. 
Keep in mind that using Shortcut efficiently might take some time. 
Keep practice little by little and you will be using Shortcut like a master!!


Here is some Shortcut list that provided from Sketchup


So this is it for Today's Skecthup Tutorial.


Today, we covered in Sketchup

1. Shortcut Settings


Thank you for reading!


-Rendering-Studio-

Thursday, May 21, 2015

Sketchup Tutorial Part 3 - Understanding the Basic

preference setting that boost up your speeed in Sketchup  


Previously, in part 1 and 2, we have covered how to setting up your Toolbars and Styles in Sketchup. In this tutorial, I will show my preference setting in Sketchup which I think it is efficient. It is only my preference setting that I come up with after the trials and fails. It is suitable for me and I think it is efficient when you are modeling in Sketchup. However, everyone have their own preference settings that works for themselves. So this is just giving you an idea if you don't have any preference setting not just yet.


In this tutorial, we are going to cover

1. Preference Settings
2. Toolbar Settings

Software that we are using: Sketchup 2015
(Sketchup 8.0 or below have similar interface so you shouldn't have any issue with following the tutorial)

Preference Settings

We will cover how to change measuring units, locations, and use it as template


Setting up the Location 


1. Drag down the existing Toolbars (IMG. 1)

  1. Clck and hold with your left mouse button
  2. Drag your Toolbar as the IMG.1
  3.  You will see the name of this Toolbar is called  "It is Getting Started"   
  4. Close the Getting Started Toolbar (It really sounds like we all newb lol)


It will be looks like this after you close up the "Getting Started" Toolbar


2. From your pull down menu
  • Window > Model Info


Click "Geo-location" (Location)
Two options are available

1. Geographic Location
2. Advanced Settings

The primary reason to setting up the location is 

1. Shadow study 
2. Import Google Earth site image into the Sketchup

Some people do not need to setup the location if you are using Sketchup just to learn (just set it up to your location for now).

Some professionals might already have clear idea where the model should be located. If so, setup the location so you get the shadows that corresponding to the location. 

It won't be big of deal if you want to skip this step. You can always able setup the location anytime.setup the location or not in Sketchup.


Geo-location is for you to grab the site image from Google Sketchup

Putting Location to where you located in or specific location for your project


Now, you can grab the image that you wanted to imported in to Sketchup

Imported the image into Sketchup. You can see the Current location setting in the Model info

As I have mentioned. It is not required for you to setup the location. But it is recommended. 


Setting up the Measuring Units


1. Model Info > Units 


Change to Decimal and Inches (Prefer Milliliter if you are in Asia).  


Uncheck Length snapping and Angle snapping (we will go over further details in later tutorial)


We just finished up with Model info setting so you can close up the Model info setting box from your Sketchup.
 

Now let's save our setting. 

File > Save As Template

If your Sketchup Version doesn't have Save As Template, use Save As
 
Name your Template and add description if it is needed. [Check the box] if you want the Template to be used whenever you open up the Sketchup.


If you are using Sketchup that does not have Save As Template:

File > Save As 

and save your template file to 

C:/Program Files (x86)/Google SketchUp 8/Templates


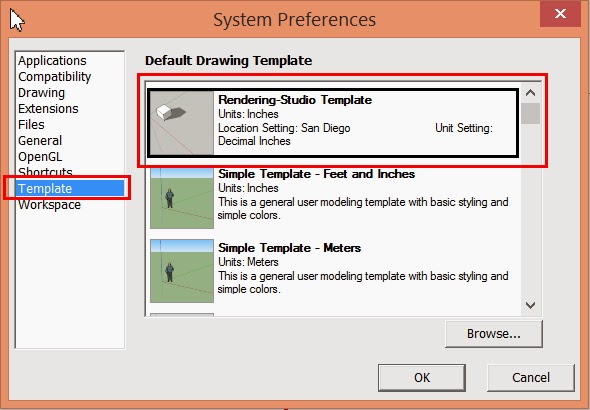
Now, Let's check that we created the Template correctly. 

  • Window > Preferences


Setting up the Toolbars


1. Window > Preferences  


Click Extensions and Make sure Advanced Camera Tools, Dynamic Components, Sandbox Tools, and Photo Textures


2. View > Toolbars  

Select all the boxes that is been checked

Click Option and Check the boxes as the Image (We don't need to click on Large Icon if you are comfortable with the Sketchup and maximize your work space.

This is my Toolbars layout. We will have similar to this or little bit different. You can follow my layout or you can create your own layout. Check our Sketchup Tutorial Part 1 - 2 for layout tips for Sketchup

So this is it for Today's Skecthup Tutorial. Pretty easy right? 

Today, we covered in Sketchup

1. Preference Settings
2. Toolbar Settings

In Next Tutorial, we will be continuing with shortcut key Setting. 


Thank you for reading!


-Rendering-Studio-


12 Excel Formulas Every Architect Should Know

Today, I like to share the article to everyone that was posted in Archidaily on May 19th. The title of the article was "12 Excel Formulas Every Architect Should Know". It was very interesting title. Excel and Architect? what is the relationship between them? We uses cool graphic software like AutoCAD, illustrator, Photoshop, Revit, Sketchup, Rhino, 3Ds Max, and so on. "Why should we have to know the Excel?"  
Well, most of us already familiar with Microsoft office which most common ones like Word, Outlook, Excel, and Powerpoint. As you know these software were around us for long time. When Design Firms or it can be any office jobs, when they are hiring, they always lists "Microsoft Office" on their job qualification. Some jobs doesn't do this but this doesn't mean they don't care! It is because they assuming that you might already have these skills. I can't imagine anyone who graduated college without using Microsoft Word. Right?
So it was interesting article for me so I like to share with others.I hope this information might be helpful to some of you.  


12 Excel Formulas Every Architect Should Know


It may not be the most exciting piece of software an architect will ever use, but Microsoft‘s Excel is a powerful tool which can help architects with the less glamorous parts of their work – and if you learn how to use it correctly, it can help you get back to the tasks that you’d rather be doing much more quickly. In this post originally published by ArchSmarter, Michael Kilkelly gives his short rundown of formulas that every architect should know – and a brief explanation of how to use each one.
Excel is more than just digital graph paper. It’s a serious tool for analyzing and computing data. In order to access this power, however, you need to understand formulas.
If you’re like me, you started using Excel as a way to create nice looking tables of data – things like building programs or drawing lists. Lots of text and some numbers. Nothing too crazy. If I was feeling a little bold, I’d add a simple formula to add or subtract some cells. That’s about it.
I knew I was using only about 10% of the  but I wasn’t sure what else it could do or how I could access the other functions. I’d heard about formulas but they seemed really confusing. Plus, I was an architect, not a bean counter.
It wasn’t until I ran into a number problem that I realized the true power of Excel. I needed to analyze the leasable area for a large mixed-use project I was working on. We were getting different area numbers from the developers. Since no one likes losing area, I had to dig through the data to figure out what was going on.
So I rolled up my sleeves, took a deep breath and plunged into the world of Excel formulas. A few hours later, I had a lean and mean spreadsheet that accurately calculated the leasable area. Using the formulas I had built, we could quickly play out scenarios for our client. This spreadsheet ended up being a really useful tool during the design phase.
Get started with Excel formulas
Inserting a formula into a cell is real easy. Just type an equals sign (=) followed by the formula. You can click the formula icon to open the “Insert Function” dialog.
You can also access all of the Excel functions through the “Formulas” ribbon. All of the formulas are grouped into categories. Click the category you want then select the formula from the list. This will open a dialog where you can input the formula parameters.
What’s the best way to learn Excel formulas? I’m a big believer in learning by doing. Take a spreadsheet you’ve created and see how you can make it better with formulas. Not sure which ones to try? Here’s my list of 12 Excel formulas every architect should know:
1. SUM
Adds together all the values in the specified range. The range can be a single column or multiple columns. You can even specify individual cells by using a comma to separate the values.
=SUM(A5:A25)
2. IF
Returns one value if a condition is true and another if the condition is false. Useful for getting a quick overview of your data. You can also use AND or OR within the IF statement to build complex logic.
=IF(A2>B2, “NEED AREA”, “AREA OK”)
3. SUMIF
Performs the SUM function only on instances that meet certain criteria. Use SUMIFS to specify multiple criteria.
=SUMIF(A1:A7, “>0″)
=SUMIFS(A1:A7, A1:A7, “>100″, A1:A7, “<200″)
4. COUNT, COUNTA, COUNTBLANK
Counts the number of items in the specified range. COUNT only counts numbers, not text or blank cells. COUNTA counts cells that are not empty. This includes number, text and other types of data. COUNTBLANK counts only cells that are blank.
=COUNT(A5:A25)
=COUNTA(A5:A25)
=COUNTBLANK(A5:A25)
5. COUNTIF
Similar to COUNT but will count only instances that meet the specified criteria. Use COUNTIFS to specify multiple criteria. For instance, rooms that are greater than 200 SF but less than 500 SF.
=COUNTIF(A1:A8, “>100″)
=COUNTIFS(A1:A8, “>100″, A1:A8, “<200″)
6. AVERAGE
Returns the average or arithmetic mean of the specified range of cells.
=AVERAGE(A5:A25)
7. MIN
Returns the smallest number in the specified range of cells. This might be useful for finding the smallest area in a programming spreadsheet.
=MIN(A5:A25)
8. MAX
Similar to MIN but this formula returns the largest number in a range of cells.
=MAX(A5:A25)
9. VLOOKUP
VLOOKUP helps Excel function more like a database than just a spreadsheet application. With it, you can search for values based on other values, which can be located in another part of the worksheet or in a completely different worksheet. In the formula, you need to specify the key value, the range of values you want to search, and the column number of the value you want to return. VLOOKUP is a little tricky to use so I highly recommend checking out this step-by-step guide.
=VLOOKUP(B3,$A$17:$B$20,2)
10. ROUND
Rounds a number to a specified number of digits. Can also use ROUNDUP and ROUNDDOWN to specify the direction of rounding.
=ROUND(7.86, 1) results in 7.9
=ROUNDUP(7.23, 0) results in 8
=ROUNDDOWN(8.85, 1) results in 8.8
11. FLOOR and CEILING
These two functions round a number up (CEILING) or down (FLOOR) to the nearest specified multiple. Useful when rounding currency.
=FLOOR(A1, 10)
=CEILING(A2, 0.25)
12. CONCATENATE
Use the CONCATENATE function to join two cells together. This function is great for piecing together text that resides in separate columns. You can also use an ampersand (&) instead of typing out CONCATENATE.
=CONCATENATE(B1, “, “, A1)
=A3& ” ” & B3
A few more things about formulas
Named ranges are great to use with formulas. Rather than typing the cell range (like A3:B4), you can enter the name (like “Level1Area”). Plus, if the range changes, just update it once in the “Name Manager”. You don’t need to update each formula.
You can review all the available formulas by going to the “Formulas” ribbon and clicking one of the icons in the “Function Library” section. All of the formulas are organized by category. Likewise, you can click the “Insert Function” button to see all the available functions.
You can include one formula in another formula. This is known as “nesting function”. In Excel 2013, you can nest up to 64 functions.
Copying and pasting formulas can sometimes be tricky. By default, Excel will increment the cell ranges when you paste a formula. Sometimes this is useful, particularly if you’re using SUM to add up a row of values. However, sometimes you want to calculate specific cells. In order to do this, use a “$” before the cell to designate it as an absolute reference. For example, if I want to multiply cell B4 with cell D3, I would type my formula as “=B4*D3″. Now, if I want to copy this formula down the column but I still want to multiply by cell D3, I would type the formula at “=B4*$D$3″. This designates cell D3 as an absolute reference so Excel doesn’t increment it.
How about you?
How do you use formulas in your spreadsheets? If so, what’s your favorite formula? Leave a comment below!
Article feature image via Shutterstock.com

Cite:

Michael Kilkelly. "12 Excel Formulas Every Architect Should Know" 19 May 2015. ArchDaily. Accessed 20 May 2015. <http://www.archdaily.com/?p=632855>

Sunday, May 17, 2015

Sketchup Tutorial Part 2 - Understanding the Basic

Style Setting for you project in Sketchup


This tutorial is just covers the very basic elements in Sketchup.

After you successfully setup your customized Toolbars (see previous tutorial), now it is time to customize "style" for the modeling in Sketchup. The reason is because some style settings aren't ideal for the complex modeling. Therefore, it is always good to go over each "style setting" and choose the stetting that will be the best for the modeling.


In this tutorial, you are only going to be cover the style setting that need for us to make template. We will cover individual style settings in the future tutorial.


In this tutorial, we are going to cover

1. Skecthup Styles
2. Edges
3. Back Edges
4. Profiles
5. Extension
6. Endpoints
7. Jitter


Edges


1. Window > Style

IMG.1


IMG.2 Style setting Box will appear


2. Style Setting  Box > Edit

Uncheck everything except Edges

IMG.3

IMG.4

Edges is basically the series of lines that needed to form the shapes. 

IMG.5 Just Edges is checked

IMG.6 Highlighted in yellow shows you an idea of the Edges 

IMG.7 Edges is unchecked - can you tell the difference?
If the Edges is unchecked, you can't see the lines and you also unable to select the lines. 
It is easier to do modeling when the Edges is checked so we will check the Edge on the Style Setting. 


Back Edges


Next, we will go over the Back Edges
Back Edges are located right below the Edges.

Or

View > Toolbars > Styles 
Style box will be appear and you can added to your menu.

*Note: Back Edges are only enable when Edges is checked.


IMG.8
or

IMG.9


The Back Edges is new feature that was added in Skecthup 8.0. If you are using Sketchup 6.0 or 7.0, you won't see this feature.  It is very similar feature as X-ray. People who uses Sketchup 6.0 or 7.0 can use X-ray instead of this feature (X-ray takes up more modeling data than using Back Edges mode). However, the X-ray takes up more modeling data and does not shows as hidden lines (See IMG.10). So as the modeling become more complex, it was very difficult to read the lines. 

IMG.10 X-ray mode, Not showing hidden lines as Back Edges mode and take more modeling data


As you can see in the Image, the Back Edges is feature that shows hidden lines of the model. 
We are going to disable Back Edges mode because we can simply turn on and off by clicking Back Edges on the menu (IMG.9). 


Profile


The Profile is similar to outline. It enable you to see the outline of the shape that you draw. 

IMG.11 by default setting, thickness is set in 2

IMG.12 Profile set by 20


Profile not needed while modeling, so it is best to be turned off while you are modeling.


Depth Cue

Depth Cue is the similar to Edge but the lines are showing thicker on the object that is closer and thinner as object is further. It is used when you want the objects look to be 3 dimensional.  

IMG.13 Depth Cue set by 20


Depth Cue also not needed while modeling, so it is best to be turned off while you are modeling.


Extensions


If you had architectural drafting experiences, you might be familiar with this feature. Extensions is lines that extended out from the objects so lines are crossover each other. This feature can be used if you prefer to give Sketchup model a classy look. 

IMG.14 Extensions set by 20


Extensions are also not needed while modeling, because it will be very hard to read the lines when you do the complicated modeling.  So it is best to be turned off while you are modeling.


Endpoints


Endpoints is feature that make lines bold at the end of the points.

IMG.15 Endpoints st by 20
   

Endpoints also not needed while modeling, so it is best to be turned off while you are modeling.


Jitters


Jitters is feature that make lines that are not straight. The best way to use this feature is when you want to give the model that looks like sketch. 

IMG.16 Jitters applied


Jitters also not needed while modeling, so it is best to be turned off while you are modeling.


So we just finished up with Sketchup Styles that available for us to use. 
In this tutorial, we covered Sketchup Styles 

Edges, Back Edges, Profiles, Depth Cue, Extensions, Endpoints, and Jitters.  

All of these styles are very effective if  you can use them appropriately. However, when we modeling, it is best to use Edges and turn off the rest.


In this Tutorial covers:

1. How to apply Styles to Skecthup models
2. Available Styles available
3. Best Style Settings for Sketchup Modeling 


Contact me if you have any question.