Showing posts with label sketchup customizing toolbars. Show all posts

Thursday, May 21, 2015

Sketchup Tutorial Part 3 - Understanding the Basic

preference setting that boost up your speeed in Sketchup  


Previously, in part 1 and 2, we have covered how to setting up your Toolbars and Styles in Sketchup. In this tutorial, I will show my preference setting in Sketchup which I think it is efficient. It is only my preference setting that I come up with after the trials and fails. It is suitable for me and I think it is efficient when you are modeling in Sketchup. However, everyone have their own preference settings that works for themselves. So this is just giving you an idea if you don't have any preference setting not just yet.


In this tutorial, we are going to cover

1. Preference Settings
2. Toolbar Settings

Software that we are using: Sketchup 2015
(Sketchup 8.0 or below have similar interface so you shouldn't have any issue with following the tutorial)

Preference Settings

We will cover how to change measuring units, locations, and use it as template


Setting up the Location 


1. Drag down the existing Toolbars (IMG. 1)

  1. Clck and hold with your left mouse button
  2. Drag your Toolbar as the IMG.1
  3.  You will see the name of this Toolbar is called  "It is Getting Started"   
  4. Close the Getting Started Toolbar (It really sounds like we all newb lol)


It will be looks like this after you close up the "Getting Started" Toolbar


2. From your pull down menu
  • Window > Model Info


Click "Geo-location" (Location)
Two options are available

1. Geographic Location
2. Advanced Settings

The primary reason to setting up the location is 

1. Shadow study 
2. Import Google Earth site image into the Sketchup

Some people do not need to setup the location if you are using Sketchup just to learn (just set it up to your location for now).

Some professionals might already have clear idea where the model should be located. If so, setup the location so you get the shadows that corresponding to the location. 

It won't be big of deal if you want to skip this step. You can always able setup the location anytime.setup the location or not in Sketchup.


Geo-location is for you to grab the site image from Google Sketchup

Putting Location to where you located in or specific location for your project


Now, you can grab the image that you wanted to imported in to Sketchup

Imported the image into Sketchup. You can see the Current location setting in the Model info

As I have mentioned. It is not required for you to setup the location. But it is recommended. 


Setting up the Measuring Units


1. Model Info > Units 


Change to Decimal and Inches (Prefer Milliliter if you are in Asia).  


Uncheck Length snapping and Angle snapping (we will go over further details in later tutorial)


We just finished up with Model info setting so you can close up the Model info setting box from your Sketchup.
 

Now let's save our setting. 

File > Save As Template

If your Sketchup Version doesn't have Save As Template, use Save As
 
Name your Template and add description if it is needed. [Check the box] if you want the Template to be used whenever you open up the Sketchup.


If you are using Sketchup that does not have Save As Template:

File > Save As 

and save your template file to 

C:/Program Files (x86)/Google SketchUp 8/Templates


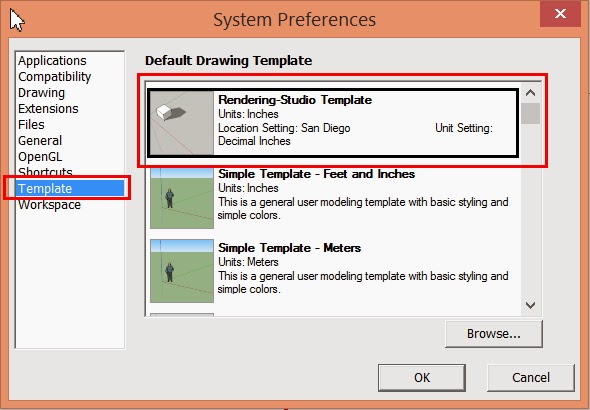
Now, Let's check that we created the Template correctly. 

  • Window > Preferences


Setting up the Toolbars


1. Window > Preferences  


Click Extensions and Make sure Advanced Camera Tools, Dynamic Components, Sandbox Tools, and Photo Textures


2. View > Toolbars  

Select all the boxes that is been checked

Click Option and Check the boxes as the Image (We don't need to click on Large Icon if you are comfortable with the Sketchup and maximize your work space.

This is my Toolbars layout. We will have similar to this or little bit different. You can follow my layout or you can create your own layout. Check our Sketchup Tutorial Part 1 - 2 for layout tips for Sketchup

So this is it for Today's Skecthup Tutorial. Pretty easy right? 

Today, we covered in Sketchup

1. Preference Settings
2. Toolbar Settings

In Next Tutorial, we will be continuing with shortcut key Setting. 


Thank you for reading!


-Rendering-Studio-


Looking for Residential Interior Design Assistant in San Diego

May 21, 2015

Unidentified Residential Interior Design Firm in San Diego currently looking for Residential Interior Design Assistant. Contact them for more detail about their Firm.


High end interior design firm is seeking an interior design assistant and drafter!

Candidate must have: 
- Architecture or Interior Design degree
- At least 2-4 years of experience in residential interior design
- Comfortable working with AutoCAD, SketchUp and Layout 
- Familiar with residential interior design process from concept to construction document stage
- Able to create and complete construction documents, including specifying plumbing, appliances, lighting and finish materials
- Team player with a great attitude, strong work ethic and ability to take direction 
- Detail oriented and work well under pressure and tight deadlines
- Excellent written and verbal communication skills
- Experience in casework construction, materials, finishes and construction detailing 

Job Roles Include:
- Creating 3D renderings, construction documents and detail drawings for custom designs
- Sourcing new products and updating/maintaining our in-house resource library
- Speaking to clients, vendors and contractors on a daily basis
- Staying organized while multitasking and performing work for many different projects
- Having fun and keeping a positive attitude when working on tight deadlines

About Our Firm: 
We are a fun, motivated and (very) busy high end residential interior design firm looking to add another rock star designer to our team. If you are positive, ambitious and looking for a flexible position with lots of growth potential, email us! We are looking to train the right candidate to be a long term member of our team. 

Individual must be very motivated and able to work in a fast-paced environment with high-end clientele and products. Should be able to quickly and professionally produce SketchUp renderings and interior elevations/sections in CAD. The position starts at 20-30 hours per week and we don't work on Fridays! 

Position is available immediately. 

If you are interested: 
Please email us your resume and digital portfolio including CAD drawings and 3D renderings in PDF format. 

Salary: 
Commensurate with experience and abilities.

Cite:
https://sandiego.craigslist.org/csd/egr/5036285379.html

Sunday, May 17, 2015

Sketchup Tutorial Part 1 - Understanding the Basic

Customize your Toolbars


This tutorial is just covers the very basic elements in Sketchup.

You might have series of toolbar if you are using ruby plugins, but this time, we are only covering toolbar that is given to us from Sketchup.


How to add or remove your Toolbars

1. View > Toolbar
   : You can add many toolbar as you desires but many of them are redundant.


We will start off with showing how to customize and placing Sketchup toolbar for your personal preferences for modeling. You can always able to going back to your original setting by clicking Restore Toolbar Position.

Save your Toolbar Setting
View > Toolbars > Save Toolbar Positions

Restore your Toolbar Setting
View > Toolbars > Restore Toolbar Positions

* Note: If you have your preferable Toolbar setting before customizing, please Save your Toolbar setting by clicking Save Toolbar Position. It will take you to this saved setting if you clicking Restore Toolbar Position.


Now let's go over Toolbar selections, as I have stated, many of Toolbars are redundant. In addition,
we normally open up the all the Toolbars on the screen because it will take up your working spaces.
Since we are talking about the working space, I will show you the way to maximize your working spaces with simple click.

*Note: This will be only applies to who makes their Toolbars setup in "Large Buttons"

Make your Toolbar Buttons smaller
View > Toolbars > Large Buttons [maker sure Large Buttons are unchecked]

IMG.1 Large Buttons are Disabled


IMG.2 Large Buttons are enabled


IMG.3 Red box showing working space when Large Buttons are disabled 


As you can see it from above IMG.3, you can see working space is little bit bigger if you are disable the Large Buttons.


 Now, all the Toolbars can be moved and placed wherever you prefer. You simply have to click left mouse button and drag. This remove your Toolbar from the Menu and appear like a popup boxes (IMG.4).  You can place these Toolbars to the specific location or putting it into Menu. Overtime, base on your needs, you will be able to come up the best Toolbar setting just for yourself.


In this Tutorial covers:

1. How to add/remove Toolbars from Skecthup
2. How to save/restore Toolbars from Sketchup
3. How to maximize working space: Disable Large Buttons in Toolbars 
4. How to customize your Toolbars from Sketchup

It is very basic and seems not much important. However, it is very effective overtime especially if you are working big projects. Having customized setting will save you lots of time during working on the project. Therefore, build your own Toolbar settings overtime.

Contact us if you have any question.